Provisioning
The ODJ allows you to provision the developer environment on your demand. You need an ODJ product and the you can start.
Introduction
A provisioning in the case of the developer environment is the configuration of the different tools and do the setup and preparation to use them. This steps were done in the past by hand. The ODJ automated that together with conventions to ensure that everything sticks together.
The provisioning is divided into two parts, the product provisioning and the component provisioning. You have to run the product provisioning first. After that, the component provisioning can be started (in some cases this happens automatically). Some of the tools are only provisioned on the product level. There is no further option on component level (even no UI element). Some of the tools are provisioned on product and component level. Here you must check the component dashboard, if you have to enter some configurations.
The ODJ create a lot of elements in all the developer tools. This is done through naming conventions and pattern. We except that certain things (like files...) are at specific places with defined names. Each tool has a section with such Conventions and restrictions.
Please read them carefully and don't modify them.
Product provisioning
The product provisioning provides the tool setup on the level of an ODJ product. For most tools, we need to create a space inside their domain.
Examples:
- an Azure DevOps project and SIAM roles
- a SonarQube portfolio, permissions and SIAM roles
- a Snyk organization and SIAM roles
Additionally, if in the product pattern "advanced", the tools are integrated in each other.
Example:
- SonarQube (category static code analysis) technical user credentials are added to Azure DevOps service connection (category pipeline)
- Artifactory (category artifact repository) technical user credentials are added to Azure DevOps service connection (category pipeline)
The UI
Empty developer environment

- Button to activate the one-click provisioning
- Button to add another category to your developer environment
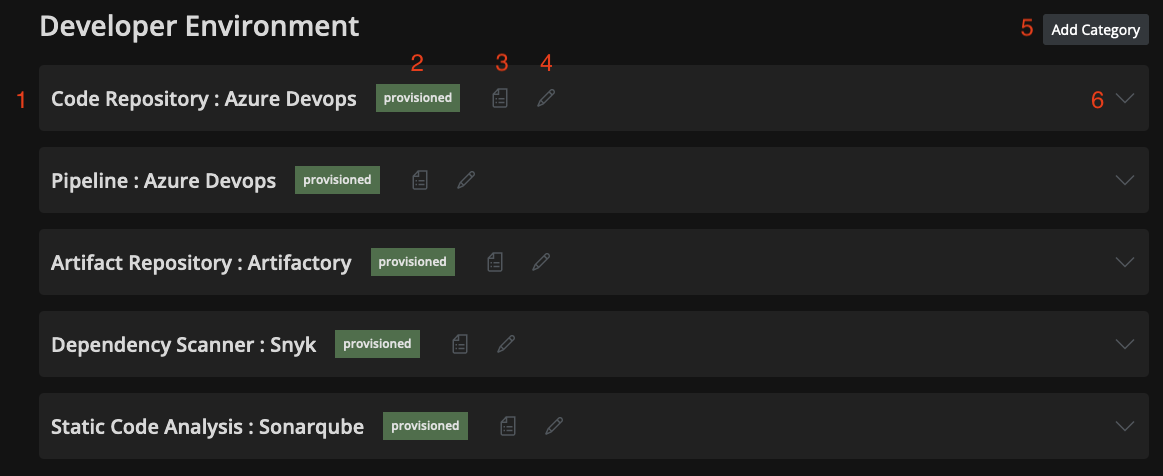
Developer environment with provisioned tools

- The provisioned tool "Snyk" in the category "Dependency Scanner"
- The provisioning status
- Button to open the status page
- Button to open the config page (if configuration is possible)
- Button to add another category to your developer environment
- Expand the tool information in the dashboard
Product pattern
In the ODJ, we support different product patterns. A product pattern defines the grade of integration between the runtime environment, developer environment and the tools. It has impact on different parts in our product and are described there.
Advanced (preferred)
This is the default pattern in the ODJ. It integrated all tools together with the runtime environment. From static code analysis to deployment in the pipeline is everything integrated and automated. All credentials for the tools are added automatically to your pipeline tool (e.g. SonarQube service connection in Azure DevOps).
You have some dependencies between the categories of the developer environment that you have to respect. The tools must be selected in an order as it makes sense for the integration.
Basic
This pattern provides you just the basic support. You can create simple runtime environments and developer environments. There is no integration between the tools. You have to handle the credentials to access the tools via the pipelines on your own. You can choose your tools from the categories freely without any dependencies (except the number restriction per category)
Component provisioning
The component provisioning provides the tool setup on the level of an ODJ component.
Keep in mind, a component is a defined piece of software that will be packaged at the end. It could be executed in your runtime environment or shared with other components.
Examples:
- a GIT repository per component (depending on your repo style choice)
- a SonarQube project
- a pipeline in Azure DevOps
This "objects" are more related to the level of a component.
Developer environment snippet for a component:

The UI
This UI shows the developer environment dashboard integrated in the component dashboard.

Auto-provisioning
For some tools, we don't need any additional configuration. Here, we can start their provisioning automatically and we don't wait for any userinput.
If you unprovision the tool, is stays unprovisioned. You have to provision it manually to get the configuration back again.
Technology selection
Depending on the technology that you have selected on the component creation, we create the pipeline that matches this technology. For some tools we need to know which tool-set you are using the configure it correct.
There are more details about the technology and the pipelines template integrations that you can find here.
One-click provisioning
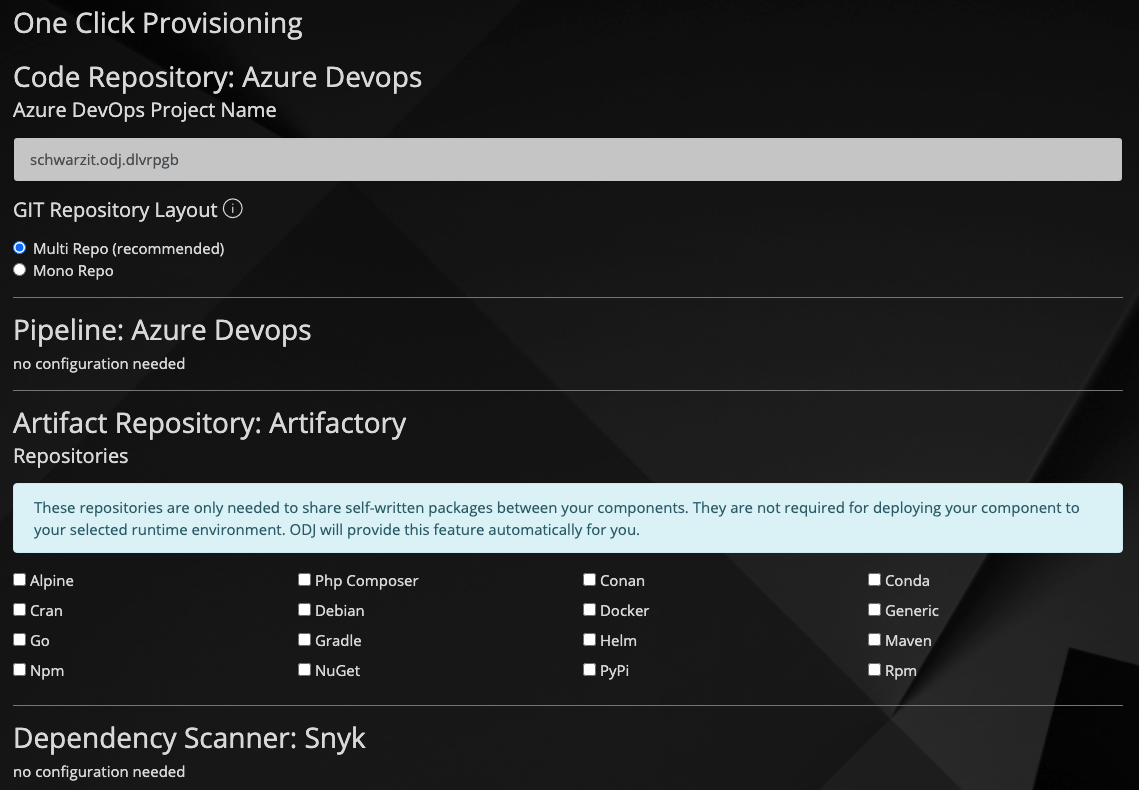
With the one-click provisioning screen we provide you an easy way to provision all the required tools in one screen. There is no need to click through all categories pages to setup your tooling. The one-click provisioning is only available for advanced products and for the first product provisioning. Technically, the one-click provisioning is a short way of clicking through all provisioning of all categories.
The one-click provisioning will be started with the button "Add Developer Environment (Categories)" in the product dashboard.
Example of the onc-click provisioning page:

This screen shows all the config screen of the tools together in one screen. After you have configured everything, the provisioning of all tools will start automatically.
After you did that, you have to check your components, because some tools require a component specific provisioning. Some categories can have an auto-provisioning and the components start their provisioning automatically for the first time.
Stepgroups
A stepgroup is a grouping of single steps that belong together and must be executed together. They exist on the level of a product and a component, but have different responsibilities. Stepgroups are only available, when you start the provisioning of a tool.
All stepgroups are designed that they retry their operations multiple times. A failed stepgroup will automatically restart 3 times until it ends up in an error. A failed stepgroup will fail the provisioning of that tool.
You can rerun a single stepgroup or all stepgroup. It doesn't matter if it is failed or successful.
This feature can be used to set your configurations to the defaults of the ODJ
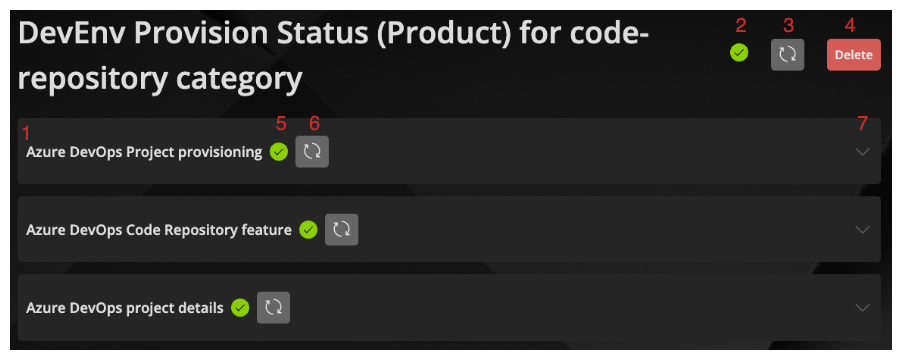
Stepgroups for a category on product level

- A stepgroup
- Status of the category provisioning
- Button to rerun all stepgroup of this category
- Button to delete this category
- Status of the stepgroup provisioning
- Button to rerun this stepgroup
- Expand stepgroup
Steps
Steps are the smallest task of work we execute in our provisioning process. When it fails, the whole stepgroup fails and the execution is stopped.
Steps in a stepgroup

- A step
- Status of the stepgroup provisioning
- Button to rerun this stepgroup
- Expand stepgroup
- Status of the step provisioning
Inter-category dependencies of steps
When adding a category to your developer environment, this could lead to an execution of additional steps in other categories. For a short time they will be showing as "pending" to run the newly added step.
This is used to add data from one category tool to another category (e.g. add the credentials for SonarQube (category static code analysis) to a service connection in Azure DevOps (category pipeline).
Impact of product type
The selected product type does have an effect of the executed stepgroups and steps. In a basic product some step's will not be triggered (e.g. creation of SonarQube service connections in Azure DevOps pipelines).
Failed stepgroup execution and error handling
See the Unprovisioning guide.
Unprovisioning
Along with creating all the elements in the tools, the ODJ can also remove everything and cleanup all the created elements. This is called unprovisioning. A cleanup is very "clicky". We want to ensure, that you don't delete things accidentally.
This step must be executed carefully. You will loose all your data. ODJ will delete We delete everything, so this step must be done carefully. We also create your source code repository, so your GIT repository will be deleted.
Unprovisioning order for product and component
You have to unprovision all your components before you can unprovision your product. This restriction is per tool.
Unprovisioning order for categories
If you have selected the product pattern "advanced", the unprovisioning does have a strict order in which you have to run the unprovisioning (related on the categories).
If you have selected the product pattern "basic", you can unprovision your tools in any order.
Failed provisioning
When a provisioning fails, ODJ will automatically retry it 3 times. After these retries, the provisioning is failed and ends up in the status ERROR.
You have then the following options:
- Restart such a failed provisioning with the rerun buttons in the stepgroups.
- Try to delete your provisioning and start it again. But keep in mind, that all data will be lost related to that category.
- Contact support